

Centralized exchanges (CEXs) usually ask for your personal data, full KYC verification, and custody of your funds. Decentralized exchanges (DEXs) let you trade straight from your own crypto wallet: no middlemen, no account freezes, no needless friction.
If you want to swap crypto fast, reach new tokens early, or keep full ownership of your assets, a DEX gives you a non-custodial way to do it. This beginner-friendly guide explains what a DEX is, how it works, and how to start trading.
Table of contents
What Is a Decentralized Exchange (DEX)?
A DEX (Decentralized Exchange) is a blockchain-based platform where you trade cryptocurrencies peer-to-peer, with no central authority in the middle. You keep your private keys and never deposit funds into an exchange wallet.
Instead of a central order book, a DEX uses smart contracts to settle trades directly on the blockchain. That removes the custodian, which cuts your exposure to exchange hacks, custodial mistakes, and frozen accounts.
DEXs usually list a wide range of tokens, including new assets that centralized platforms have not touched yet. Because anyone can use them and every trade is visible on-chain, they appeal to people who value privacy, autonomy, and self-custody.
For leveraged trading on-chain, see the best perpetual DEXs.
Before you can use a decentralized exchange, you need a non-custodial wallet to connect and manage your funds. Our guide to the best decentralized crypto wallets covers the safest and most DeFi-friendly options for beginners and advanced users.
How a DEX Works
Three pieces do the work: the Automated Market Maker (AMM) model, liquidity pools, and smart contracts.
Liquidity Pools
Users called liquidity providers (LPs) deposit two tokens into a pool (for example, ETH/USDC). Those pools are what you trade against, and LPs earn a share of every swap fee in return.
Token Swaps
When you swap on a DEX, a smart contract handles the whole trade: it takes your tokens, updates the pool, and sends the new tokens to your wallet. Once the trade is on-chain, no one can alter or reverse it, and you never have to trust a counterparty.
Fees
DEX users pay:
- Network fees (for example, gas fees on Ethereum);
- Swap fees, which go to LPs and the protocol treasury.
Those fees flow back into the ecosystem, not to a company holding your money.
Wallet-Based Access
DEXs are non-custodial. You connect with a crypto wallet (MetaMask, for example) that holds your funds and private keys. There are no email signups and no password resets, because there is no account to reset.
No KYC Required
Most DEXs do not ask for KYC, so anyone with a wallet can reach global crypto markets. The flip side: no one vets the tokens either. Do your own research before trading new or thinly traded tokens.
What Can You Do with a Decentralized Exchange?
On most DEX platforms you can:
- Swap tokens instantly, with no third-party approval;
- Trade from a non-custodial crypto wallet (full control, no custodian);
- Buy crypto with any supported token pair;
- Reach new tokens and trading pairs, often before they list on a CEX;
- Provide liquidity to pools and earn a share of trading fees;
- Schedule trades using third-party dApps and tools;
- Track real-time token prices and slippage across DEX platforms;
- Take part in yield farming and DeFi staking;
- Keep your privacy, since most platforms require no KYC.
The Most Popular DEXs
Five of the most widely used DEX platforms today:
- Uniswap (built on Ethereum);
- PancakeSwap (runs on BNB Chain, formerly Binance Smart Chain);
- SushiSwap;
- Curve Finance;
- 1inch.
To show you how to get around a decentralized exchange and use its full range of features, we’ll walk through each action above using Uniswap as the main example.
Layouts and token lists vary a little from one DEX to the next, but the core trading process is almost identical across most of them.
How to Set Up a Crypto Wallet for DEX Use: Step-by-Step Guide
Before you trade on a DEX like Uniswap or PancakeSwap, you need a non-custodial wallet that supports Ethereum and other blockchain assets. Here is how to set one up so you can connect and trade safely.
One option made by the exchange itself is looked at in this review of the Uniswap Wallet.
Step 1. Choose a Wallet
Pick a wallet that supports ERC-20 tokens and Web3 connections. Popular options include:
- MetaMask (the most common choice for Ethereum DEXs like Uniswap);
- Coinbase Wallet;
- Brave Wallet;
- Phantom (for Solana-based DEXs);
- Uniswap Wallet;
- WalletConnect (a protocol that links many mobile wallets to DEXs).
We’ll use MetaMask in this example. It works in the browser and on mobile, connects to most major DEXs, and is easy for beginners.
Step 2. Install the Wallet App or Extension
For Desktop:
- Visit the official MetaMask site;
- Download the extension for Chrome, Brave, Firefox, or Edge.
For Mobile:
- Go to the App Store (iOS) or Google Play (Android);
- Search for MetaMask and install the app.
Important: only download wallets from official sources. Fake apps and phishing sites exist to steal recovery phrases, and there is no one to call once the funds are gone.
Step 3. Create Your Wallet
- Open the app and click “Create a Wallet”;
- Set a strong password;
- Write down your 12-word secret recovery phrase;
- Store it offline (never in cloud storage or a screenshot).
Lose that phrase and no one can recover your wallet or your funds. There is no support desk. You are your own bank.
Step 4. Fund Your Wallet
You need ETH (or the native token of your target DEX’s chain) to pay gas fees and start trading. There are three common ways to add crypto:
- Buy ETH directly in MetaMask with a card or payment service;
- Send crypto from a centralized exchange (for example, Binance or Coinbase);
- Receive funds from another wallet.
Even a small amount is enough to start learning how trading on a decentralized exchange works.
How to Connect Your Crypto Wallet to a DEX: Step-by-Step Guide
Connecting your wallet is the first step before you trade on a DEX like Uniswap or SushiSwap. Follow these steps to link it and start swapping.
Step 1. Open the DEX and Click “Connect”
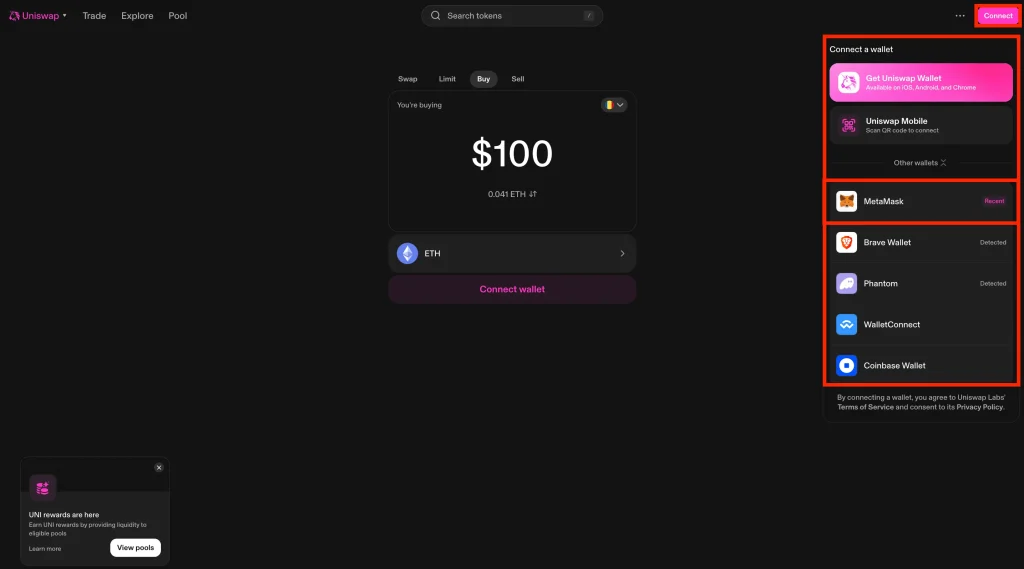
- Visit the official DEX website. Check the URL carefully: fake DEX sites exist to drain wallets.
- Click “Launch App” or open the trading interface.
- Find the “Connect” or “Connect Wallet” button, usually in the top right corner.
- Pick your wallet from the supported options, such as MetaMask, WalletConnect, or Coinbase Wallet.
Step 2. Approve the Connection in Your Wallet
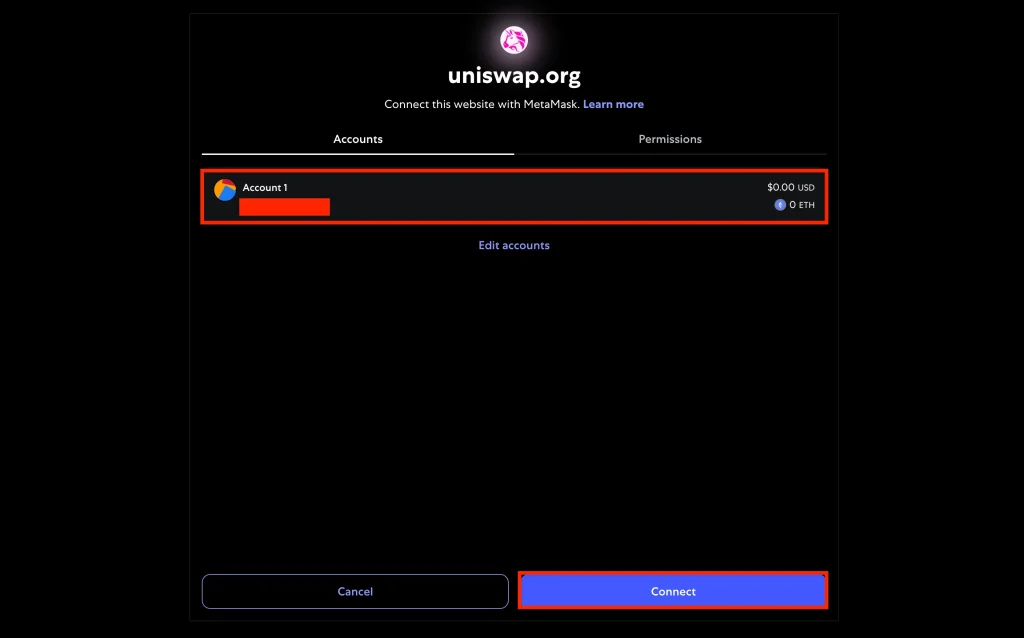
- Your wallet opens a pop-up or extension window.
- Choose the account you want to connect.
- Approve the connection request.
- The DEX never takes custody of your funds. Connecting only lets it propose transactions; every swap, trade, or deposit still needs your approval in the wallet.
- Once connected, you can swap, trade, or provide liquidity straight from your wallet.
That is it. Your wallet is linked, your keys stay with you, and you can disconnect the site from your wallet whenever you like.
How to Use a DEX to Swap Tokens: Step-by-Step Guide
Step 1. Go to the “Swap” Tab and Select Your Tokens
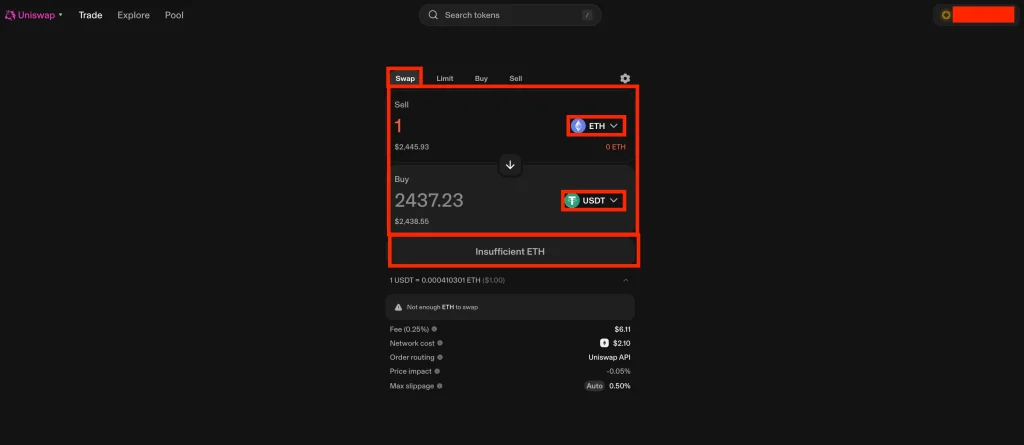
With your wallet connected, open the Swap tab on the DEX. Choose the token you want to sell, enter the amount, then pick the token you want to receive. Before you commit, the DEX shows you real-time details: the exchange rate, transaction fees, price impact, and the minimum you will receive after slippage.
Every swap runs through a liquidity pool funded by liquidity providers. The deeper the pool, the less your trade moves the price. When the numbers look right, click Swap.
Step 2. Confirm the Swap and Approve the Transaction
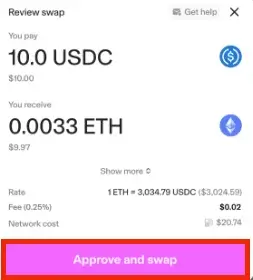
You will see a breakdown of the tokens, rate, gas fee, slippage, and routing.
Click Confirm Swap, then approve the transaction in your wallet. The first time you sell a particular token, you also need to approve it so the smart contract can spend it. That approval is a separate on-chain transaction, so expect a gas fee for it. After that, sign the final confirmation.
Once the transaction confirms on-chain, the new tokens land in your wallet.
How to Use a DEX to Send Crypto (To the DEX or Another Wallet): Step-by-Step Guide
Step 1. Open the “Send” Tab and Fill Out the Details
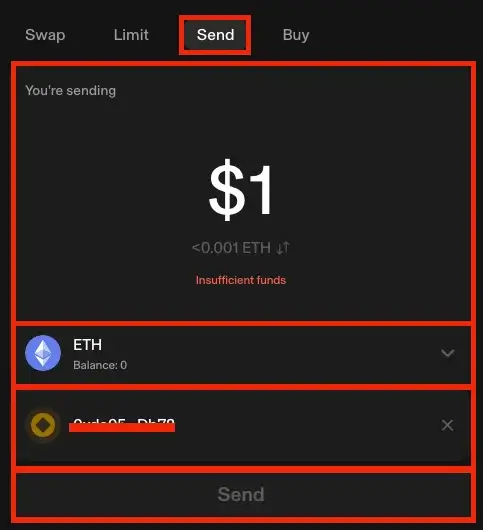
Connect your wallet to the DEX and open the Send tab. Choose the token, enter the amount, and paste the recipient’s address or ENS name. If you are funding your own trading or liquidity activity, send to your connected wallet address. If you are sending to someone else, make sure their wallet supports the token and that it sits on the same network (Ethereum, in our example). Double-check the address before you go on. Blockchain transfers cannot be reversed, and one wrong character means the funds are gone for good.
On Solana the wallet choice matters as much as the venue. Our Phantom vs Solflare comparison covers the two main options.
Step 2. Confirm and Send
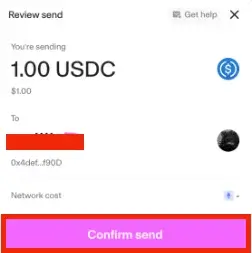
Review every detail: token, amount, destination, and estimated fee. Click Confirm Send, then approve the transaction in your wallet. The network processes the transfer on-chain and delivers it to the target address. No intermediary touches it along the way.
How to Use a DEX to Buy Crypto Directly on It: Step-by-Step Guide
Step 1. Open the “Buy” Tab and Enter Purchase Details
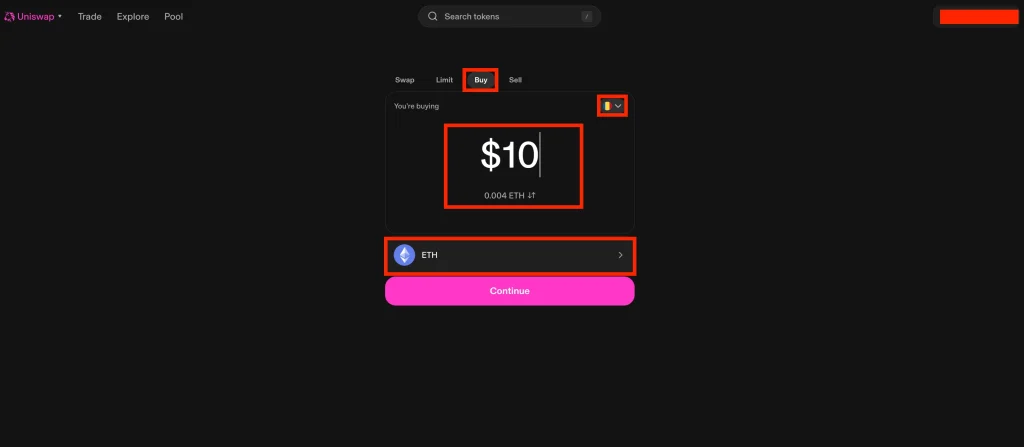
With your wallet connected, click the Buy tab at the top of the DEX. Select your region, pick the asset you want (usually ETH, though other tokens may be offered), enter the amount, and hit Continue.
Step 2. Choose a Provider and Complete the Transaction
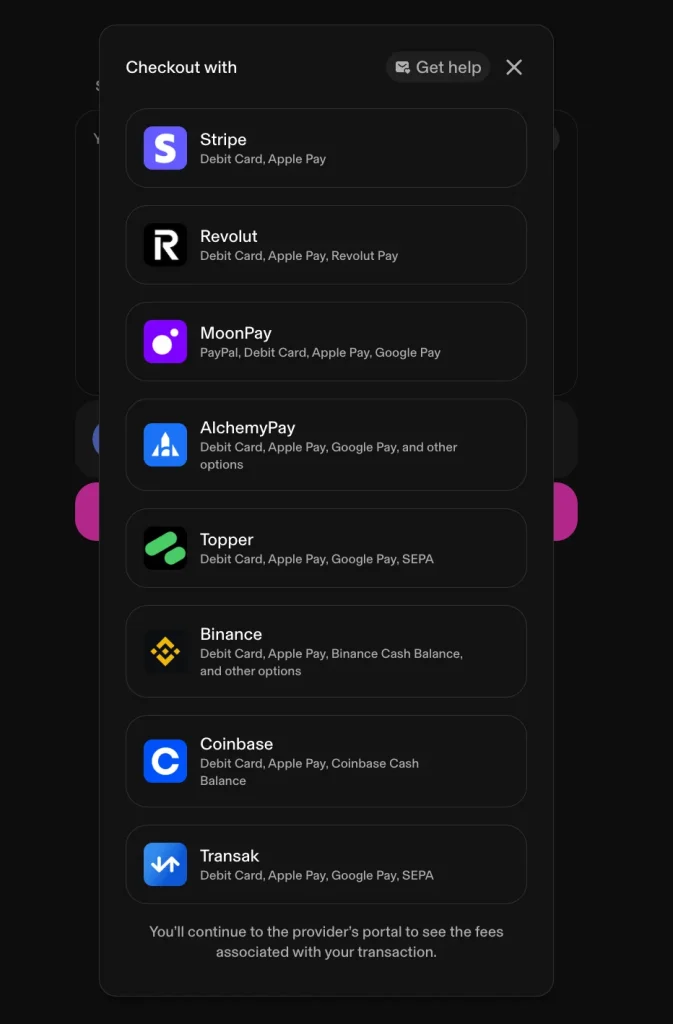
The DEX lists the fiat on-ramp providers available in your location. These may include Coinbase Pay, MoonPay, Revolut, Stripe, and Transak. Pick one and you will be sent to the provider’s own site to pay.
Depending on the provider, you may need to verify your email or phone number or upload an ID. Expect some level of KYC when you buy crypto with fiat, even through a DEX. The check comes from the payment provider, not the exchange.
Once payment clears, the assets land in your connected wallet, ready to swap, trade, or deposit into a liquidity pool.
How to Provide Liquidity to a DEX: Step-by-Step Guide
Step 1. Go to the “Pool” Tab, Press “Create Position”, and Select Your Tokens
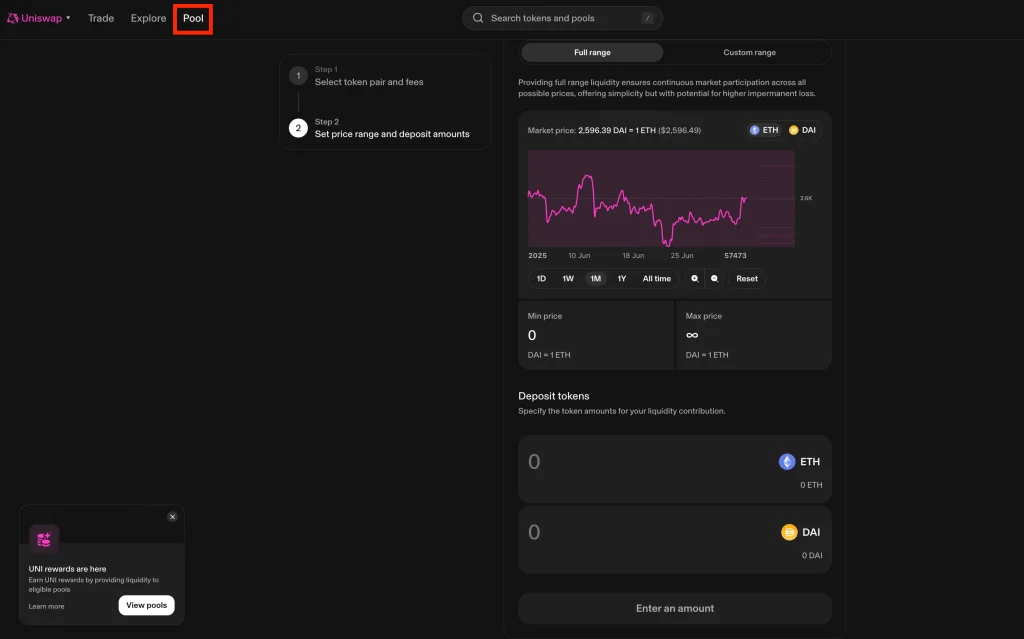
With your wallet connected, open the Pool section of the DEX and press Create Position. Choose the two tokens you want to deposit (this is your trading pair) and enter how much you will contribute. The DEX balances the ratio automatically at current exchange rates. It also shows your share of the pool, projected earnings from trading fees, and the current pool size.
Step 2. Approve and Confirm Your Deposit
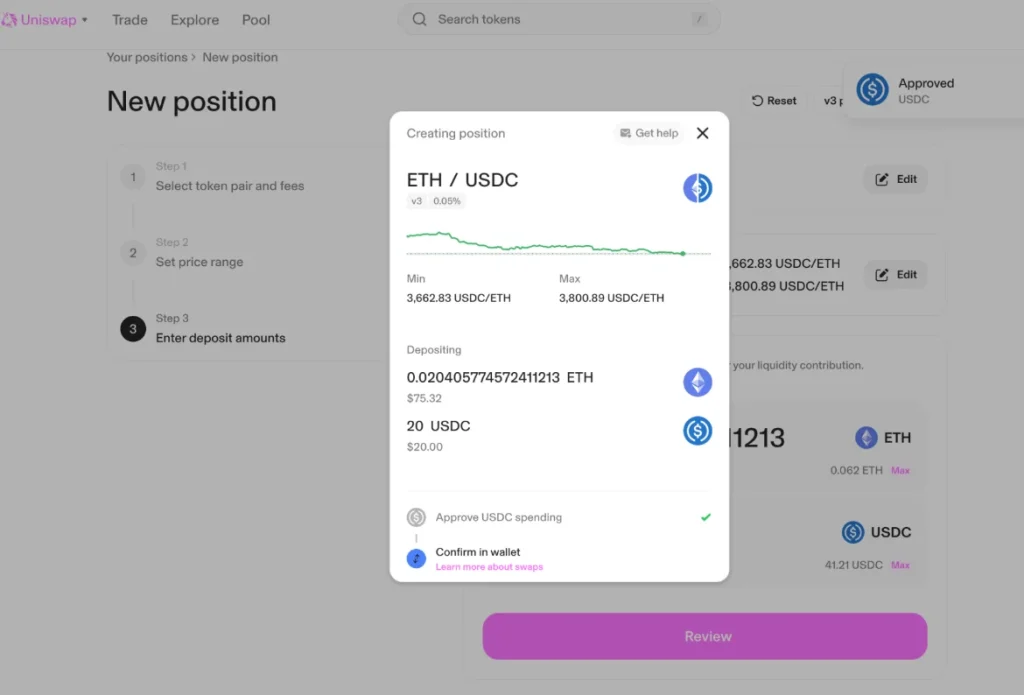
Approve both tokens in your wallet if you have not already, then confirm the transaction to deposit. The DEX issues LP tokens (liquidity provider tokens) that represent your share of the pool. Every time someone swaps through it, you earn a cut of the fees in proportion to your contribution. You can withdraw at any time by removing your liquidity. One caveat: if the two tokens’ prices drift apart, your position can end up worth less than if you had simply held them, a risk known as impermanent loss.
FAQ
What Are the Benefits and Drawbacks of Using a DEX?
The benefits: lower fees, faster access, and full control of your assets with no centralized middleman. You trade tokens and stablecoins peer-to-peer, log in with your wallet instead of an account, and stay anonymous on most platforms. The drawbacks: liquidity varies, especially for lesser-known tokens, and most DEXs offer no support or recovery if you make a mistake. Send to the wrong address or approve a malicious contract, and you are on your own.
How to Access the DEX Infrastructure?
All you need is a supported crypto wallet and an internet connection. Most DEXs are web apps that connect directly to wallets like MetaMask or through WalletConnect. Once connected, you can trade, add liquidity, or explore other DeFi products without a central authority. Many DEXs also have beginner-friendly, mobile-compatible interfaces, so you can get started within minutes.
What Is a Gas Fee, and How Is It Calculated?
A gas fee is what you pay to run a transaction or a smart contract on a blockchain like Ethereum. It depends on network congestion (supply and demand for block space) and how complex the action is. The busier the network, the higher the fee. DEXs often run on Layer 1 chains where gas spikes during heavy trading, so check a fee estimator before you submit a transaction.
How to Schedule Crypto Trades on DEXes?
Standard DEX interfaces do not offer native scheduling, but some third-party tools and smart contract services can automate trades for you. They plug into DEXs and execute when your conditions are met, such as a price target or a time window. That is useful for managing entries in volatile markets without watching the screen 24/7.
Can I Trade All Cryptocurrency on a DEX?
No. Not every cryptocurrency is on every DEX. Availability depends on which trading pairs exist and whether they have liquidity. DEXs on chains like Ethereum or BNB Chain support a wide range of tokens, but coins that are not wrapped or native to that chain may only trade on centralized exchanges. Check availability before you commit.
What Is Slippage, and How Can I Avoid It?
Slippage is when your trade fills at a different price than you expected, usually because liquidity is thin or prices are moving fast. To limit it, trade when the network is calm, set a slippage tolerance that matches your risk level, and use DEXs with deeper liquidity pools. Smaller trades, or splitting a large one into several, also reduce the impact.
Is It Safe to Use a DEX?
Mostly, yes, with caveats. DEXs run on open-source blockchain technology and smart contracts, so you never hand your assets to a central authority and you keep control of your wallet throughout. The risks are human error, fake clone sites, and bugs in contract code. Stick with well-known DEXs that publish audits, have a strong community behind them, and have a track record of running without incident.
Final Thoughts
You now know how to use a decentralized exchange: connect a wallet, swap tokens, buy crypto with fiat, send funds, and provide liquidity.
Whether you are here for quick trades or deeper DeFi strategies, a DEX puts you in the driver’s seat. Stay alert, double-check every address and approval, and enjoy trading on your own terms.
How I review: Reviewed by Andrei B. I buy the hardware wallets I review, test every product myself and score it on security, UI/UX, ease of use, price and supported coins. Before I publish, I also check recent user reviews and any hack reports.
The whole process is explained on the How We Review page. You can read more about me, or contact me with corrections, from the links at the bottom of this page. For general safety advice, see the FTC guide to cryptocurrency scams.