

Want to bridge tokens from Ethereum to Polygon without overpaying, or losing them along the way?
Bridging assets between networks can be confusing, especially the first time. The steps are unclear, the fees are unpredictable, and confirmations can take longer than you expect.
Ethereum gas fees alone can make a simple transfer expensive. Without guidance, moving tokens to a faster, cheaper network like Polygon feels anything but straightforward.
This guide breaks it down. We’ll show you two reliable ways to bridge assets from Ethereum to Polygon: the official Polygon Bridge, and the DeFi bridge Across.to.
Both let you move tokens in a single transaction flow, then take advantage of Polygon’s lower fees and faster confirmations.
Let’s get started.
Table of contents
Before Bridging: Add the Polygon Network to Your Wallet
Before you bridge tokens from Ethereum to Polygon, make sure your crypto wallet supports both networks. MetaMask is one of the most popular wallets for this job, but out of the box it only shows the Ethereum network.
You need to add the Polygon network yourself. Here’s how in MetaMask:
- Open your MetaMask wallet.
- Click the current network name at the top-left (for example, “Ethereum Mainnet”).
- Scroll to the “Additional network” section.
- Find Polygon Mainnet and click “Add” on the right.
- Approve the network switch when prompted.
Once Polygon is added, you’re ready to bridge tokens from ETH to Polygon.
1. How to Bridge Tokens Using The Polygon Portal Bridge
Step 1. Open the Polygon Portal and Connect Your Wallet
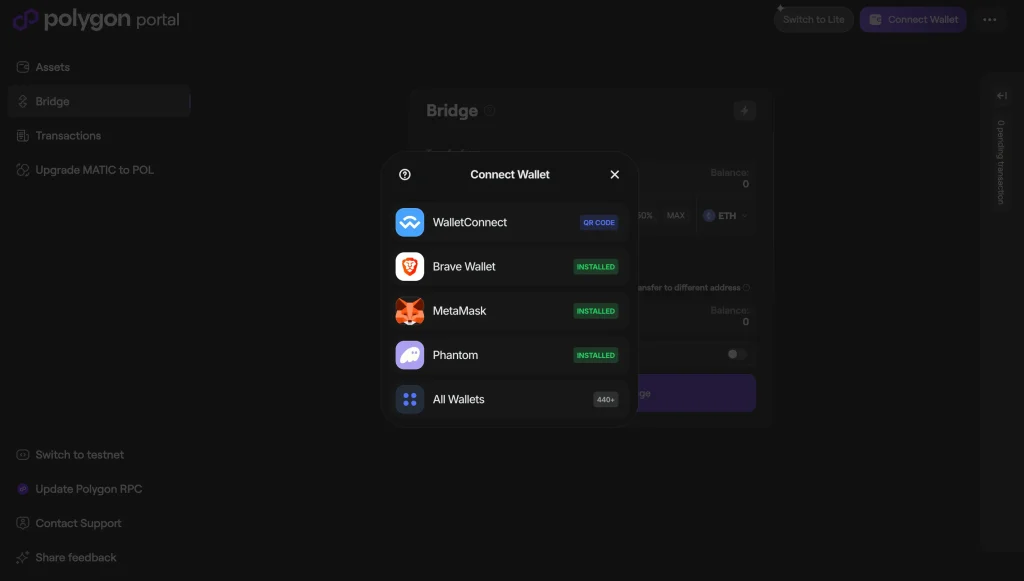
Go to the Polygon Portal and select “Bridge” from the left-side menu. This is the official Polygon Bridge interface. It moves tokens from Ethereum to Polygon through the Polygon PoS Bridge, so you’re using Polygon’s own infrastructure rather than a third-party service.
Click “Connect Wallet” and choose a Web3 wallet like MetaMask. Make sure the wallet has both the Ethereum mainnet and the Polygon network added, and holds enough ETH to cover gas for the bridge transaction. Without enough ETH, the transaction won’t go through.
Why both networks? You start on Ethereum in MetaMask to send your ETH to the bridge. When bridging finishes, your funds land on Polygon, and MetaMask needs that network added before it can show them.
Step 2. Select Token, Enter Amount, and Start the Bridge Transaction
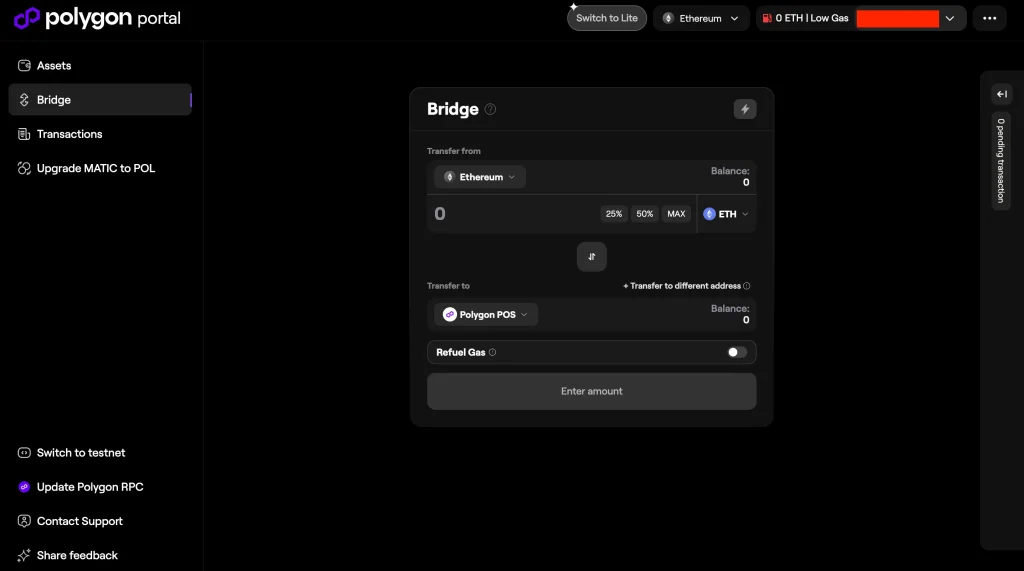
Choose the token you want to bridge to Polygon (in our case, ETH) and enter the amount.
Double-check everything, then click “Bridge Ethereum to Polygon PoS” and confirm the transaction in your wallet. Under the hood, smart contracts lock your tokens on Ethereum and release the equivalent amount on Polygon. You can track the transaction status in the bridge interface or on Etherscan.
Step 3. Switch to the Polygon Network
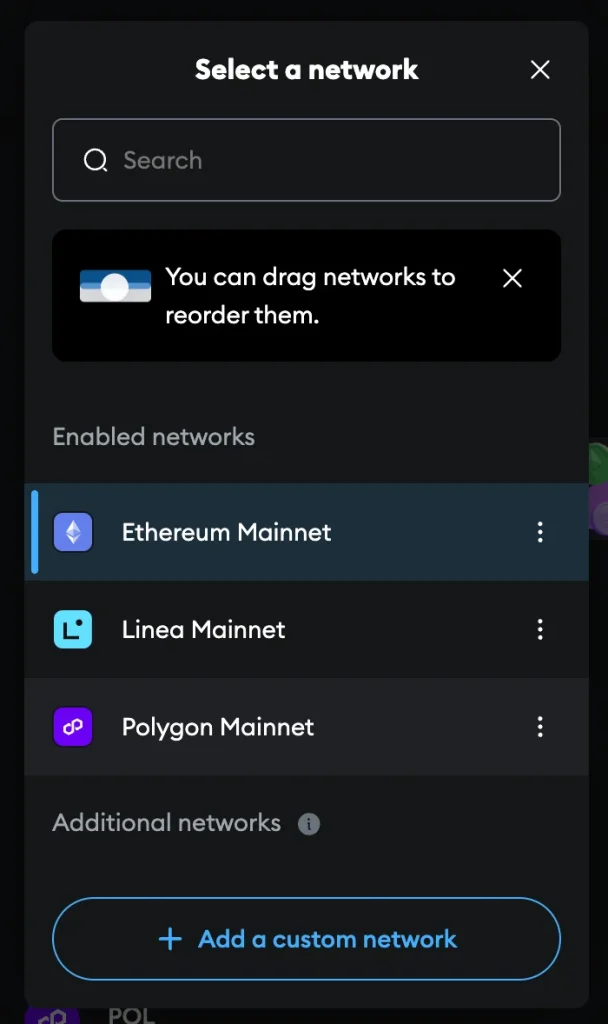
Once the transaction confirms, switch your wallet to the Polygon network. Your bridged tokens will show up there. From here you can use them across the Polygon ecosystem, including decentralized applications, with lower fees and faster confirmations than on Ethereum.
2. How to Bridge Tokens by Using The DeFi Platform Across.to
Step 1. Go to Across.to and Connect Your Wallet
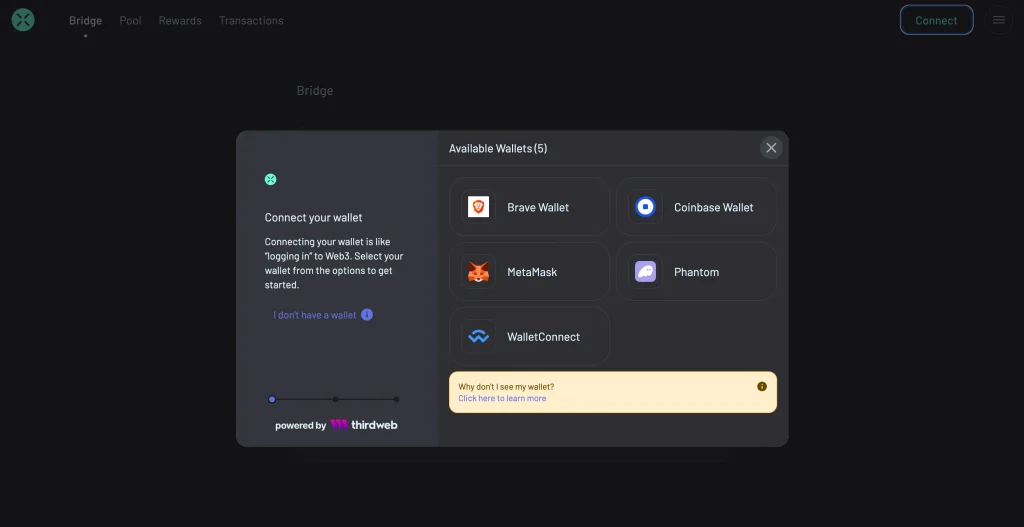
Visit the official Across website. Across is a cross-chain bridge with a simple interface built for speed and low cost.
Click “Connect Wallet” and choose a Web3 wallet like MetaMask. As with the Polygon Portal, make sure your wallet has both the Ethereum and Polygon networks added and holds ETH for gas.
Step 2. Choose the Chains, Select the Token, and the Amount
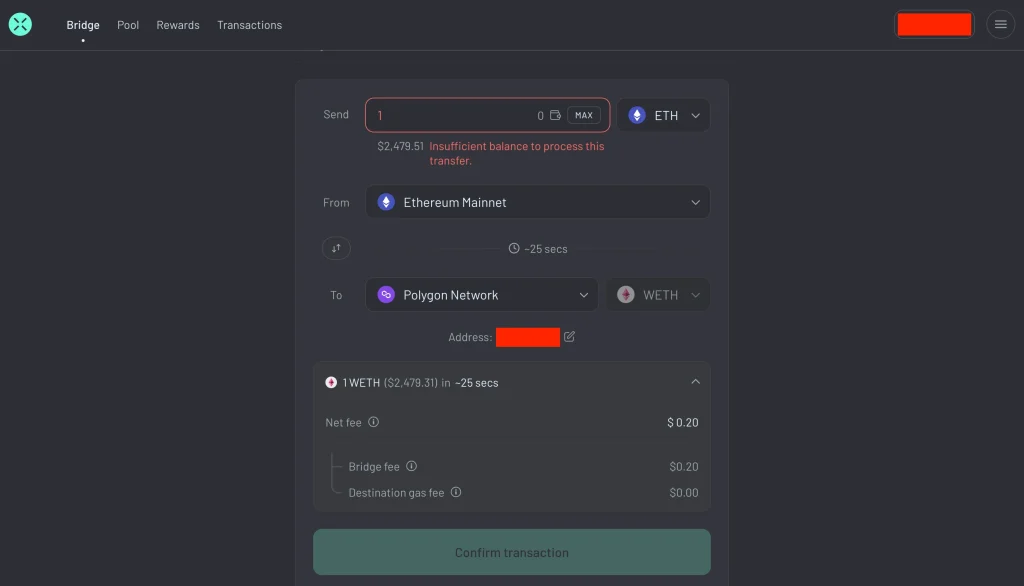
Set Ethereum as the source chain and Polygon as the destination.
Choose the token you want to bridge and enter the amount. Across then shows the transaction details: expected arrival time, fee estimates (both the bridge fee and destination gas), and current network conditions. You see the full cost before you commit anything.
Step 3. Review Your Transfer and Confirm Transaction
Review your transfer. Across shows live status updates and lists every fee up front. Confirm you’re sending to the right chain and the right token. A bridge to the wrong destination is hard to undo.
Click “Bridge” and approve the transaction in your wallet. Across uses relayers and liquidity pools to settle on Polygon in minutes, which is faster than many other bridges. Once it’s done, check your Polygon wallet for the funds.
FAQ
What Does It Mean to Bridge Crypto to Another Crypto?
Bridging crypto means moving tokens from one blockchain to another (for example, from Ethereum to Polygon) using a bridge. The bridge locks your assets on the first chain and mints an equal amount on the second, so you can use them in a different ecosystem.
What is the Polygon Bridge?
The Polygon Bridge is Polygon’s official tool for moving tokens from Ethereum to Polygon. It covers two routes, the PoS Bridge and the Plasma Bridge, which differ in speed and security. It’s a core part of the Polygon ecosystem because it’s how assets get onto Polygon for use in decentralized applications.
Can You Bridge Ethereum to Polygon?
Yes. You can bridge Ethereum to Polygon with the official Polygon Bridge or another bridging DApp. This moves your ETH or Ethereum-based assets onto the Polygon network, where fees are lower and transactions confirm faster.
What are the Benefits of Bridging to Polygon?
Three main ones: much lower fees than on Ethereum, faster transactions, and access to the DeFi platforms and decentralized applications in the Polygon ecosystem.
How Much Does It Cost to Bridge ETH to Polygon?
The main cost is Ethereum mainnet gas, which rises and falls with network congestion. Polygon doesn’t charge its own bridging fee, but you still need ETH in your wallet to pay for the bridge transaction. Once your funds are on Polygon PoS, transaction fees are a small fraction of what you pay on Ethereum.
How to Use Polygon Bridging DApps?
The flow is the same on any Polygon bridging DApp: connect your wallet, pick the token you want to bridge, choose the direction (for example, Ethereum to Polygon), approve the token, and confirm the bridge transaction.
Can Best Wallet Receive ETH on Polygon?
Yes. If your wallet supports both the Ethereum and Polygon networks (most leading wallets do), it can receive ETH bridged to Polygon. Wallets like MetaMask let you switch between networks in a couple of clicks, so it’s easy to bridge ETH and spend it on Polygon day to day.
What is the Main Difference Between a Crypto Swap and a Crypto Bridge?
A crypto swap exchanges one cryptocurrency for another on the same blockchain. A crypto bridge moves assets between different blockchains.
Is Bridging Crypto Safe?
Bridging is generally safe when you use trusted tools like the official Polygon Bridge or a verified DApp. The main risks are smart contract bugs and unreliable bridges. Phishing copies of bridge sites exist, and funds sent through one are usually unrecoverable. Always double-check the URL and confirm you’re on the real platform before you start the bridge transaction.
Final Thoughts
Bridging from ETH to Polygon is faster, simpler, and cheaper than it used to be. With the Polygon Portal Bridge and cross-chain platforms like Across.to, you get a secure, smooth transfer whether it’s your first bridge or your fiftieth.
And if you ever want to bridge Polygon back to ETH, the process is much the same.
Whether you’re moving funds to use DeFi applications, access Ethereum-based applications, or handle large transactions, both methods cost less and run faster than staying on Ethereum alone.
Pick the method that fits your goals and you get the best of both chains: Ethereum’s assets with Polygon’s speed and low fees. And because you approve every step in your own wallet, you stay in control of your keys the whole way.
More From WalletReview
Discover the Best Decentralized Exchanges in 2026
A breakdown of top DEXs for secure, peer-to-peer crypto trading.
Best Crypto Cold Wallets: Top 5 Storage Options (2026)
Keep your assets offline and secure with these cold wallet picks.
5 Best Crypto Hardware Wallets for 2026
Reviewing the most reliable hardware wallets for safety in 2026.
6 Best Crypto Staking Platform Choices in 2026
Explore the platforms offering the best rewards and security.
Electrum Wallet Review (2026)
Is Electrum still the best Bitcoin-only wallet? Full review here.
How I review: Reviewed by Andrei B. I buy the hardware wallets I review, test every product myself and score it on security, UI/UX, ease of use, price and supported coins. Before I publish, I also check recent user reviews and any hack reports.
The whole process is explained on the How We Review page. You can read more about me, or contact me with corrections, from the links at the bottom of this page. For general safety advice, see the FTC guide to cryptocurrency scams.